Author Archives: Muhammad

Setting up Landoop’s Kafka-Connect-ui on Mac

Setting up Landoop’s Kafka-Connect-ui on Mac

In this post, we are going to setup the third of the series of tools by Landoop to manage Confluent services for Kafka. Landoop provides Kafka-connect-ui to manage connectors in Kafka-connect. The tools is available as a Docker image on DockerHub, so let’s first pull it on our machine.

docker pull landoop/kafka-connect-ui

docker pull landoop/kafka-connect-ui

Now we need to enable CORS. Just make sure that you update the properties file for Kafka Connect being used. I had to update the following file. Please note that I am running Confluent service locally on my MacBook using Confluent CLI.

Update connect properties

Update connect properties

In order to update the CORS configs, just add the following lines to the property file. This should allow all requests from a different domain. In your production environment, you can be more restricted.

Now we can restart confluent services using Confluent CLI as follows:

Confluent stop Confluent start

Confluent stop
Confluent start

Finally we can run the docker image for Kafka-connect-ui. It must be remembered that you need to specify the actual IP address to avoid docker and host machine address mappings.

docker run --rm -p 8000:8000 -e "CONNECT_URL=http://192.168.1.101:8083" landoop/kafka-connect-ui

docker run –rm -p 8000:8000 -e “CONNECT_URL=http://192.168.1.101:8083” landoop/kafka-connect-ui

And here you can open it in the Browser. It shows up as follows for a single cluster setup:

kafka-connect-ui

kafka-connect-ui

Using Landoop’s Schema Registry UI

Using Landoop’s Schema Registry UI

In this post, we are going to setup Schema Registry UI for Confluent’s schema registry using Docker Image for the tool. Schema Registry is an amazing tool by Landoop. It’s available in Github.

Let’s first pull the image from Docker Hub.

Schema Registry UI Docker Pull

Schema Registry UI Docker Pull

Now we can simply run the docker image by forwarding the port forwarding. Plus we need to specify the URI for our schema registry.

schema-registry-ui-running

schema-registry-ui-running

But as we run it and try to load the main page. We notice the error on the main page. Chrome’s Developer Tool should shed more light on the error. It’s actually CORS issue on our Schema Registry side.

Connectivity Error

Connectivity Error

So we need to enable CORS on our Schema Registry properties file. Let’s open /etc/schema-registry/ folder.

Screen Shot 2017-10-25 at 12.28.21 AM

Just make sure that we restart the confluent services after this change. Actually it should be enough if we just restart the schema registry service.

confluent start

confluent start

Now when we reload the page, the site loads just fine.

Screen Shot 2017-10-25 at 12.33.37 AM

Installing Confluent Platform on Mac OS

Installing Confluent Platform on Mac OS

There are no direct download instructions available on the confluent platform yet to install the packages on Mac OS. I just want to share it with others just in case someone might need some help with this.

Download the Archive

The zip packages can be downloaded from here: Download. After downloading unzip and copy it to a relevant folder.

Pre-requisite for Running

In order to run the platform, we need Java installed on our machine with version >= 7. Let’s first verify the version we have on my machine.

Screen Shot 2017-10-24 at 8.46.50 PM

We also need to verify if the JAVA_HOME environment variable is correctly set on the machine. Additionally, the $PATH environment variable must be set, otherwise, the services wouldn’t just start.

Screen Shot 2017-10-24 at 9.35.14 PM

Running Confluent CLI

Now we can simply run Confluent CLI from the bin folder of unzipped downloaded package. You should see the following help if you run it.

Confluent CLI

Confluent CLI

And finally all the services are running fine as we run it using confluent start.

Screen Shot 2017-10-24 at 9.55.33 PM

Confluent Components & Their HTTP Ports

Confluent Components & Their HTTP Ports

It is very important to remember the ports of individual components of Confluent Platform. The following is the list of default ports for the respective components. It must be remembered that these ports can be overridden during deployment.

Confluent components Ports

Confluent components Ports

More details can be found on this page on confluent.io where this is copied from:

Screen Shot 2017-10-21 at 4.27.09 PM

Log4J Dependency with Kafka

Log4J Dependency with Kafka

Many of the Kafka artifacts have Log4J dependencies. If you are using logback then your logging stops all of a sudden. Here is an example for one of our sample app. Here we have added such dependency and the App seems to have issues with multiple SL4J bindings. It has finally picked up Log4J instead.

If we look at this log, clearly the other binding is coming from Log4J. If we look at the Project tab, we can also see log4J artifact being added here.

log4j dependency

log4j dependency

Here is our current build.sbt. It has “io.confluent” % “kafka-avro-serializer” % “1.0”, which is pulling up log4J as a dependency.

The solution is simple. We just need to tell SBT not to pull Log4J as dependency of this library.

And now we can see that the artifact for Log4J is removed from the external libraries.

log4j dependency exclusion

log4j dependency exclusion

Packaging configurations outside Jars with SBT Native Plugin

Packaging configurations outside Jars with SBT Native Plugin

In this post we are going to see how we can separately package any files (especially config and log configuration) out of packaged jar when we use sbt native packager for packaging our scala application. Here we are building from our last post.

In order to use sbt native packager; first we need to add the plugin in our packages configuration file (packages.sbt) under project folder.

Now we need to enable the plugin. Here JavaAppPackaging would package up jar files for our application. We can also notice a couple of mappings configurations. They copy application.dev.conf and logback.dev.xml files from resources folder to conf folder in the resulting package.

We have very simple configurations for our application.conf and application.dev.conf. We are simply keeping config.environment configuration. It has been assigned Debug and Dev values for debug and dev environments.

In order to demonstrate what configuration file is being used; here we are just pulling up config.environment configuration and logging it. Here we are using typesafe configs for handling with configuration files. If we simply run this code in IntelliJ debugger, you can notice that it pulls up application.conf file by default, hence writing Debug message to the logs.

debug-config

debug-config

Let’s simply package it using sbt. Here we are running sbt universal:packageBin to package it.

Packaging

Packaging

And this is how it packages it. You can notice that it has copied application.dev.conf and logback.dev.xml separately in conf folder.

separate-configs

separate-configs

Let’s simple run it using. We can notice that it has picked up application.conf file for configuration and has written Debug to the logs.

debug-config-used

debug-config-used

We can override configuration file using -Dconfig.file argument. We can also override logback configuration file using -Dlogback.configurationFile argument.

But below we have just overridden the configuration file. You can notice that it has written Dev to the logs. This shows that it has correctly picked up application.dev.conf file as specified in the startup argument.

dev-config-used

dev-config-used

avro-tools in Scala Projects – Don’t…

avro-tools in Scala Projects – Don’t…
In this post we are going to discuss how Avro-tools dependency can mess up your logging in a Scala project. Let’s create a sample Scala SBT project.

2017-10-11_10-56-01

We update the build.sbt as follows:

Here are we adding dependencies for logback in addition to avro-tools dependency.

Let’s create a simple Main and add logging here.

Your editor (IntelliJ) might show you that there are multiple sources for LoggerFactory. Both jar files has the same package too. This should ring some alarms. You must remember that avro-tools is not adding org.sl4j as a dependency jar but it provides an implementation of LoggerFactory embedded into its own jar file. So you cannot use exclusion here.

multiple-implementations

multiple-implementations

Let’s also add configuration for logback to specify details of our required appenders.

But there is no log file created. Now just remove avro-tools dependency from your sbt file and now you can see the log file created. So, definitely avro-tools dependency has messed it up.

logFile

logFile

But you might have avro types added to your project. You wouldn’t be able to compile now as the required types are missing. But you don’t need the avro-tools here for this purpose. You can simply add dependency for “org.apache.avro” % “avro” % “1.8.2”, which is the latest version as of this blog post.

This should have no effect on your logging.

Kafka Message Size Issue – Record Too Long to Send

Kafka Message Size Issue – Record Too Long to Send

As soon as the message size increases, Kafka starts throwing errors when sending the message. Here are the error message we received when sending a message with size a few mege bytes.

RecordTooLarge

RecordTooLarge

The message clearly suggests that the size needs to updated in some configuration file before we could send it. Since we are specifying the sending details in the properties configuration, let’s add the configuration for the message size in the properties configuration too.

But the error message doesn’t go away but it changes to a different form. We are still getting a similar message:

Record Too Large for Server

Record Too Large for Server

You also need to update it on the Confluent side. Here are the updates I made to server.properties and producer.properties as specified at this github post:

Using Avro Schema in JVM based applications

Using Avro Schema in JVM based applications

Like Protobuf, Apache Avro is specially suitable for organizations with polyglot development stack. Data serialized through one language can easily be deserialized in other language on the other end of your messaging platform. This is one of the supported serialization for Confluent platform.

The benefits of Avro over other formats including Protobuf and Thrift is the usage both data and schema in serialization and deserialization. So you don’t need to generate types and still be able to use the data using the available schema. Having said that, it is really not necessary for the schema to be put on the wire for sending it to some other party. This is the approach used by Confluent platform where a separate Schema registry is introduced which is used to contain this meta data. So before sending data over to Kafka, a schema must be already registered with Schema registry. Only Schema Id is put with data on Kafka brokers. As the data reaches a consumer, this schema Id is used to pull the schema definition from the registry and used for deserialization.

The current version of the specification is 1.8.2. You can get more details from the specification page.

Options for Serialization / Deserialization

There a few options for serialization / serialization into using Avro schema. After serialization, we can send it over wire. This can be received on the other end, and deserialized. The sender and receiver don’t have to be implemented using the same languages / platforms.

Generating Java Classes

In this approach, avrotools is used to generate Java classes from the schema file. More than one file can be used here. It is also possible to have more than one record in the same avro schema file, but avrotools would still generate separate files for these types.

You can also directly create Scala class using the following:

Using Parser for Serialization / Deserialization

In this approach, we directly use the schema files in our code and use it for generating records. I am sure, this would look a little loose design to you as the records would be generated in a key / value fashion. Actually a GenericRecord is created, which can then used to build up an object.

Avro in a Scala Application

Let’s create a simple Scala SBT Project. We are naming the application as StudentApp.

Create App

Create App

Defining Avro Schema

First of all, we need to define schema for types expected to be shared between applications. These schemas can be used to generate types in the language of choice for applications.

The schema introduces a type Student in studentModels schema. It has three properties, which are student_id (int), first_name (string) and last_name (string). The last of these are nullable.

Using avro-tools

Since we need to use it in a JVM based application, we can use Java implementation of Avro to generate Java types using the above schema. Let’s first download avro-tools for 1.8.2 specification from Apache.

Download Avro Tools

Download Avro Tools

Here we are compiling the schema and generating types in java/generated folder.

But when we open type, we get all these indication of errors, and sure enough, the code doesn’t even compile. So what are we missing?

Generated Code Error

Generated Code Error

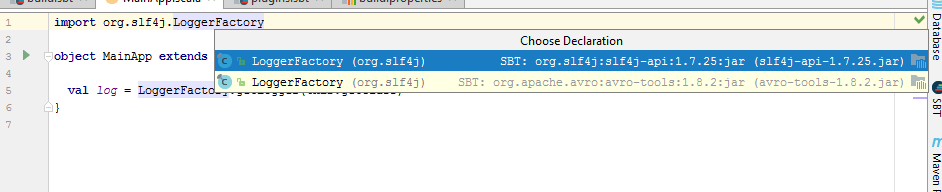
In order to fix this, we need to add the following dependencies to our build.sbt file; and sure enough, the compilation is successful finally.

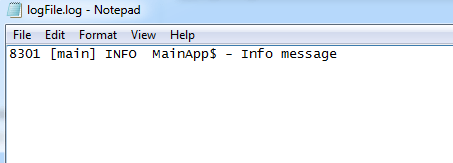
Now we can simply use the generated type in our Scala code. Here we are simply creating building a Student instance. Later, we are just printing the properties of the instance to the console.

Download Code

Download code

Download code