Monthly Archives: June 2014

Android Development – Offline Support

This post is amongst the series of post for discussion about development of an App in Android Platform. We have been developing an app, named GitHub Contributions as an example. In each post, we keep adding some new feature to the app, which adds to our knowledge about android.

In this post, we are going to see how we can add offline support to our app. So if a user has launched our app and there is no internet connection available, we cannot download user profile’s data from github.com. In this case, we can show any previous data downloaded for the specified user. If we are running the app for the first time for the user, then we can just show a Not-Connected message on the screen. As soon as the user connects to the network, we can attempt to download the information and show the pretty view.

What to display when not connected?

Developing Offline support for your app, also includes how to notify user of no connectivity. Since the regular view needs the actual data to be shown, it doesn’t really make sense to still load the whole view with empty data. I think the better option is to display a simpler view with details about inactivity and if there is anything a user can do to fix it.

layoutresourcefile_create

In order to keep things simple here, we are just showing a message to the user. It should say “Not Connected!”.

Checking Network Connectivity

We can use ConnectivityManager to determine network state. In the code below, we are checking if the device is connected to a network. We can use Context to get the ConnectivityManager object from system. It is registered as a system service CONNECTIVITY_SERVICE.

Since we are periodically downloading user data after every 3 hours. We need to register for connectivity changes to allow application state based on the connectivity. A BroadcastReceiver can be registered in a Context for the specified intent. Here is the definition of ConnectivityReceiver.

When the connectivity changes for the device, onReceive() would be called. Here we are using the same connectivity service to determine the current state of connectivity and updating the Activity about this.

Simulator & Checking Network Connectivity

If you are debugging your app in a simulator then the NetworkInfo would always consider the phone to be connected. In order to test the connectivity logic, we can put the phone in Airplane mode. In this case, the layout definition for “not connected” state would appear as follows:

NotConnectedDisplayed

Permission to Access Network State

Now if we run the application as is, we get the following exception when we try to get the state of network.

SecurityException

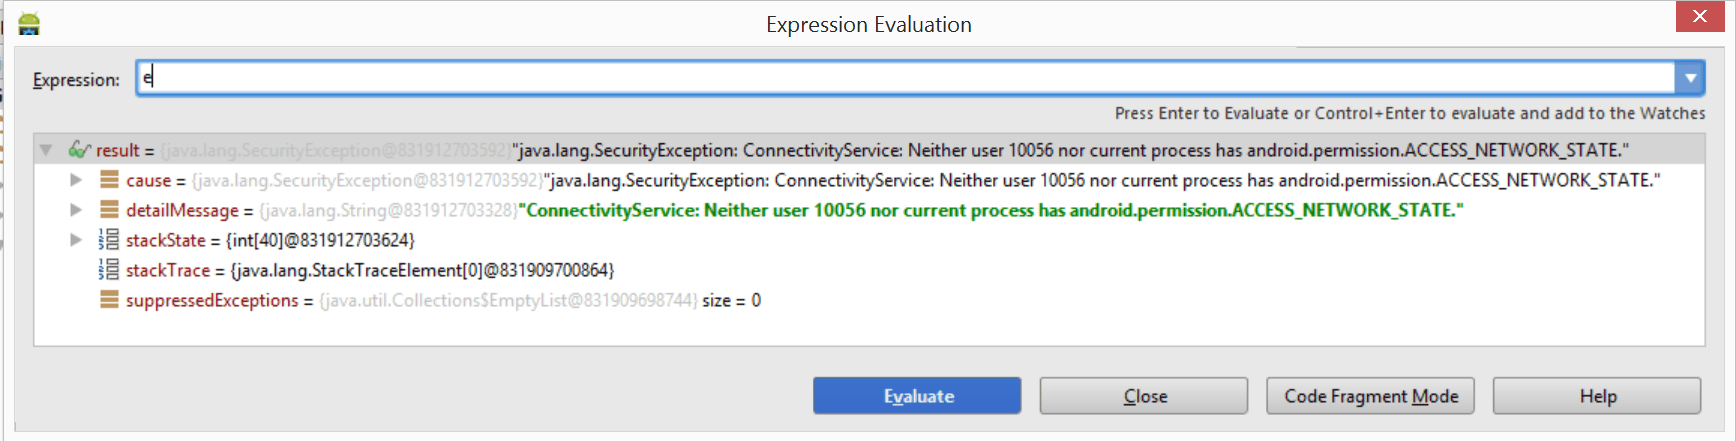
Actually we need to request permissions for accessing network state in AndroidManifest.xml. We can define it as following:

App Startup

When the app starts up, onCreate() is called. Here we need to decide what information we need to display to the user. It is also the the usual place to set the layout resource definition xml to be used for the activity. In our case, we can determine, if the user is connected to the network, if so, we can use the older logic to download user information only in the case that the user information is not current i.e. downloaded less than 3 hours ago.

We have also updated to loadUserDetails() to relax the 3 hours requirement for using the user’s data from persistence. If the user is not connected, we can show the older data. On the other hand, we wouldn’t use older data if the user is connected and would download the fresh data at app startup.

Changing modes with Connectivity changes

Since our app can be used in online and offline modes, we need to update the app state when connectivity state changes.

Get it from Git

AndroidApp_GitHubDownload

Android Development – Scheduled Execution

This is a continuation of our post discussing different areas of android development. We are getting introduced to android development while developing an application GitHub Contributions App.
There are a number of ways we can delay processing of some work in android. It also allows us to execute these work items on a periodic basis. There are a number of options for an android developer for introducing scheduled execution.

Refactoring the code

Before we start scheduling the work, we know that the scheduled download would involve getting the online data. Our current AsyncTasks would not support so. They would check if we have recent data in the files and would provide the data stored in file to the activity. So we need to refactor the code to separate the data load from internal storage and online. Let’s first create these base classes. They would be extended by their specialized classes for internal storage and online.

Here are the extended types to support loading user profile information from online and internal storage. The online version, in addition to download information, also serializes the info.

Similar should be the implementation for specialized types for repository data. It also has two types to download the same details.

When to load information from Internal Storage

We should remember that we only need to load information from internal storage when the application is launched. After every periodic load of information every three hours, it is download form online github profile of the user. Let’s introduce a boolean flag isLoaded. The flag is initially reset. After the application is loaded by finishing execution of onCreate(), the flag is set.

We have also updated the definition of loadUserDetails() to use this flag. Since the same method is used for initial and all the subsequent load of information, the above code should ensure that the async tasks loading information from internal storage are only used the first time. They would also not be used when the information in the internal storage is not current.

Using Scheduled Executor Service

There are number of options available for periodic execution of code in android. ScheduledExecutorService is one such option. It provides options for these executions at fixed rate or intervals.

schedulethreadpoolexecutor

We can use Executors type to get an instance of ScheduleExecutorService. Executors is a type available in java.util.concurrent package. It provides factory methods for Executor, ExecutorService, ScheduledExecutorService and ThreadPoolExecutor.

Other Options for Delayed / Periodic Executions in Android

Android has a number of other options to post a single or periodic executions of some code block. Let’s briefly discuss some of them.

Handler

Handlers are used to delay the execution of some code and post it after the specified delay. It can also use a HandlerThread to support executing on a different thread.

HandlerThread

There is no associated message loop for a thread. Looper can be used to create a message loop for a thread. HandlerThread provides a message loop which can be used by Handler instance.

Since we don’t just need to delay the execution butt we need to introduce periodic execution, we have avoided using Handler type for our case.

Timer

If you are coming for a non-android platform, then this is the first option you would think about for scheduled execution. There are a number of timers you might be used to in C#. You might want to dig for single and multithreaded timers. We can introduce timers to delay processing of some work (one-shot) or performing it on a periodic basis (recurring). They can also be fixed-period or fixed-rate. The former ensures every-next execution to start based on the start time of the previous execution, while the latter would just fire-off every time the duration lapses without any consideration of possible delay starting the previous run. There are a number of schedule() methods available in the Timer for choosing among these modes.

timers_android

Timers can be created to execute on a user or daemon thread. For .net developers, they are respectively similar to foreground and background threads.

It must be remembered that Timers are not recommended for newer development using Android. Developers are encouraged to use ScheduledThreadPoolExecutorService.

Alarm Manager
AlarmManager can also be used to execute some code block at some later time. It can also be used to execute it on periodic basis. But this is more system wide approach. Beginning API 19, Alarms are also not exact. Details here.

Get from Git

AndroidApp_GitHubDownload

GitHub Contributions – Add File Storage

This is a continuation of a post for building an android app for displaying GitHub contributions of a user. We are using name of user for pulling down profile and repository details of the user. As we are adding features to the app, we have been learning about android and its development model.

Currently we are at the point that we can download the data asynchronously and display it on the UI. User can also change user and the data is downloaded for the new user. In this post, we want to build up on this by adding the following:

Keep the data in a file so that when the app needs it it can just be pulled from a file rather than being downloaded from the web. This can also cater to the offline scenarios when the app is launched while being disconnected from the network. We also don’t need to download data if the app is launched within 3 hours of when the data was downloaded last time.

Since a picture is worth a thousand words, let us try to depict the storage model for android apps.

AndroidStorage

There are basically two types of storage available for an android app. They are internal and external storage. Here internal storage is an always available storage with the contents only visible for the app under consideration. Au contraire, the contents of external storage are accessible to other apps plus it may or may not not available. An uninstall removes all app data except the data specifically in the public area of external storage.

Since we don’t need to share GitHub contribution’s data with any other app, we will be keeping it in internal storage. The data would include profile and repository data for a GitHub user. In order to make our life easier, we will be keeping the data in JSON format.

Adding Serializer

Let’s add a serializer to manager persistence of profile and repository data. The responsibility of serializer is to serialize / deserialize profile and repository data. It also needs to check if the files are current. The definition of current in our system is that it is not older than 3 hours.

GitHubProfileSerializer

Checking if Data is Current

In order to avoid frequently download the user information, we have decided to keep it in a file storage. We need to check the file’s last modified date for our decision to download. Now this would require comparing the last modified date of file to the current machine’s time. Here we are using Calendar to get the current time. The literal integer value is the number of milliseconds for 3 hours. So if the duration is lesser than 3 hours, it is OK to get it from persistence. In order to keep things simpler, we are just checking for file to save repositories data.

Serialization Data Format

In order to serialize we can simply convert the data in to byte[]. We can then push the byte array to internal storage using FileOutputStream. We would be creating this after serializing it in JSON format. We can simply read data using FileInputStream. Here is the code we are using to save data to internal file storage and getting the data from it.

As discussed above, data is being converted to JSON format before sending it out to the storage. For our project, we are using GSON library for this conversion. Earlier we have discussed how we can add a JAR library to a project in Android Studio.

Since we have bitmap data in the profile, we are creating a memento for holding profile data excluding avatar’s bitmap. The bitmap is saved in a separate file.

Download Vs Load from Internal Storage

We have separate AsyncTask (s) for providing the profile and repositories data. Currently it just downloads it. Here we can make a decision to download it only when data is not current. Following is the code for providing profile data. It is using the same isPersistedDataCurrent from PersistenceHandler to check if data is current.

And we have similar code for repositories data.

Get code from GitHub

AndroidApp_GitHubDownload

Android Studio – Adding Library to your Project

In this short post we will be learning how we can add a JAR library to our project in Android Studio. Here we are using Android Preview 0.5.4 edition.

Let’s use Gson library. This is used to serialize / deserialize java objects to JSON format. Please see the license requirements before using in your project.

DownloadGson

Just download it from the above location from Google Code and copy it to the lib folder of your project. As you copy it to the folder you would see this dialog opened. You can just hit OK here.

CopyGsonToLibFolder

We need to update the build file (build.gradle) to include the lib for building the project. You don’t have to worry anymore as Android studio now includes everything form the lib folder now.

buildGradle

Now just make sure that you clean the project before using the types from the library.

CleanProject

GitHub Contributions App – Creating Hyperlinks

This is a continuation of our posts adding features to GitHub Contributions App. We have been developing this app on android. The app allows loading some important details from the profile of a github user including the repositories list. The information is provided by GitHub through HTTP Service.

In this small post, we will be updating the blog address to a hyperlink. You would be amazed to know that there is no separate View type in android for hyperlinks.

paul_github_link

We add the hyperlinks using the same TextView type. We can create hyperlinks for web-links, maps, email and other types. Clicking on the hyperlink text would open the corresponding apps selection registered for this. These are the default types supported to include hyperlinks. This is similar to applications registered for particular URI scheme in microsoft’s world [See this].

android_autolinks

We just need to update the definition of TextView with the particular type of link. Since we are interested in opening the user’s blog in a browser, we need to select web here.

Now let’s update the code and start debugging it again using the same emulator.

blog_link

You can see that the blog address is updated as link. As we click the link, the browser opens up the blog.

Get it from GitHub

AndroidApp_GitHubDownload

GitHub Contributions App – Android App Preferences

In the previous post, we started creating GitHub Contributions App for Andrdoid. We saw how we can access HTTP REST Service using HttpClient, how we can update permissions specially to access network resources, plus the details about performing actions on background thread while showing the result on UI thread. We also saw how we can define string resources and use them in our code and layout definition.

In this post we are continuing with the app. We will be updating the action bar from default to custom. Currently, you can only see author’s GitHub contributions. We will be providing a setting to change GitHub user. The feature will be provided by adding an action bar button for settings.

appUpdates

Creating Icon

We can use Android Asset studio to create icons from clipart. You can find it here:

AndroidAssetStudio

Here we need an icon for settings. Let us use this clipart to create icons:

settings_clipart

It allows creating icons for different resolutions. We can download the icons as a single zip file and copy them in the respective folders in our project. We can then reference these icons as drawable resources.

icons_dim

Action Bar Button for Settings

Let us first add a resource directory to hold the definition of action bar. Now we can add a menu resource to the directory.

addmenuresource

We update the contents of the menu resource to include settings menu item. Here we are using the icon we created above. There are three possible options for a menu item to display in action bar. They are as follows:

  1. never
  2. always
  3. ifRoom

Since we just have one menu item, we are always showing it.

Now we need to hook up this menu to the activity’s action bar. We add a menu resource to activity’s menu in onCreateOptionsMenu method. In order to associate activity’s action bar with menu from the resource file, we use MenuInflater obtained using getMenuInflater for the activity.

When an item is selected from the menu, the framework calls onOptionsItemSelected method with the menu item selected. Since we only have one menu, we have a simplified implementation of this method. Here we are just calling openSettings method. We will be providing the definition of this method later in this post.

Defining Preferences

Now we need to allow user to enter userName of the github contributor we are interested to see the profile of. Android provides a whole API around preferences. These preferences can be local to the application or they can be shared with other apps. We can also provide a read-only or read/write access to other apps.

preferencesXml

Since we just need a single preference to store the user name, we just need and EditTextPreference, this would show a TextView to show and update the value of the preference. Here we can provide a default value, title and summary information for the preference. The key can be used to later get the value of the preference. It must be remembered that Android preferences are stored as key / value pairs. Let’s update the contents of the xml with the following:

Create Settings Activity

We need to create an activity to display preferences. We use PreferenceActivity for this purpose.

android_preferences_activity

In order to keep things simple we let’s update the contents of the file containing the activity definition. Here we are using addPreferenceFromResource method from PreferenceActivity. The method is deprecated. In some next post, we will try to update this with the newer recommended approach. We can pass the preference, we created above, to the method.

The preference API revolves around SharedPreference. It provides storing and retrieving data in the form of key/value pairs.

Adding Settings Activity to GitHub Card

Now the stage is all set. We can add the Settings activity to GitHub card. In the openSettings() method we can start this like any other activity i.e. we can create an Intent for the activity, then we can start it using one of the methods provide by Activity. Since we need to load the view again with the updated user name, we are using the overload startActivityForResult. This would make sure that the framework calls onActivityResult method when the activity returns.

Here we have moved the part where it loads the user profile and repository data to loadUserDetails() method. The method is being called from onActivityResult() method. We have also updated activity’s onCreate() to use the same.

You might remember the preference definition where we used pref_loginName to store user name. Here we are using the same to retrieve the value. If there has never been a value saved for the key, it should return the default value “msiddiqi” which is the github profile name for the author of this post. PreferenceManager is used to get the SharedPreference for the activity.

After retrieving the user name, we can use the same AsyncTask (s) to load user profile and repository details.

Running the App

Before running the App, let me tell you that we can capture the virtual / real device under debug using DDMS.

DDMS_ScreenCapture

As we run the application, we don’t have any value for the specified key in the preference, so it should return the default value “msiddiqi”. In the onCreate method, it should use the default value to load user’s GitHub profile details.

defaultScreenLoad

Now open preference activity by clicking the Settings button in the action bar. It should open the view for SettingsActivity. As the activity is defined it using preferences defined in preferences.xml. This just includes EditTextPreference for user name. Selecting the preference opens the last saved or default value for the preference. Let’s update the user to paulcbetts. Paul is the main contributor to Reactive UI framework.

updateUserName

After updating the user as we head back to the main activity, it should load the profile and repository details for paul. The view is updated as follows:

paul_github

This should be the same view if we exit the application and launch it again.

Download Code from GitHub

AndroidApp_GitHubDownload