Author Archives: Muhammad

Play framework with Scala – Getting Started

Play framework with Scala – Getting Started

Play is a web framework based on JVM languages including Scala and Java. This post is about getting you up running a basic Hello world application with Scala using IntelliJ IDEA.

Download IntelliJ IDEA

IntelliJ IDEA can be downloaded from JetBrains. Here is the download link:

IntelliJ IDEA download

IntelliJ IDEA download

Downloading Activator

There are many example projects and templates available for scala. The same is true for Play framework. There are myriads of demos available for checking out how a particular feature needs to be implemented. They also enable us to seed a project saving the setup time.

There are activators available from different providers including Lightbend. These activators allow us to download these templates and demos. Let’s download an activator from LightBend to seed our play project.

Lightbend Activator Download

Lightbend Activator Download

or we can download these templates directly.

Lightbend Templates

Light Bend Templates

There are three tasks you can do with activator. They are as follows:

  • Running activator UI (./activator ui)
  • Listing available templates (./activator list-templates)
  • Creating new project based on a particular template (./activator new {TEMPLATE_NAME})

If you want to go to the activator route, then you can look for templates using list-templates switch. And then you can create a new project based on the template of your choice using new switch.

This creates a project in the selected folder.

Lightbend New Project

Lightbend New Project

We can open this in the IntelliJ IDE downloaded earlier. Here are the contents of the folder for created project.

Lightbend new project details

Lightbend New Project Details

As you can notice there are files more than the project files themselves. Please note the activator. This allows us to build and run play from the terminal easily. Here we are using activator to run our play project. This would use the default netty server to host the project.

Screen Shot 2016-03-06 at 2.13.56 PM

And here is how the default page for the project.

Activator running play

Activator running play

ConEmu – A developer’s productivity tool

ConEmu – A developer’s productivity tool
As a developer, we are used to using different shells. They include command shell, power shell, Git Bash and so on. They are all available separately. The also need to run separately. In an every day development life, it is difficult to manage each shell screen individually. They also lack a lot of features. This is specially true for command prompt which nearly looks like a stone-age tool where it is difficult to do basic stuff like resize a window or copy / paste text.

The tool can be downloaded from a different places. Here we are downloading it from primary and official download mirror.

download

download

Running the tool for the first time allows us to specify some basic settings. Here is the settings page as the tool is loaded for the first time. After these settings are specified, they can be updated in the Settings page.

ConEmu Startup

ConEmu Startup

Settings

ConEmu is a highly configurable tool. It allows updating a number of settings from Settings tab. These settings are searchable.

Settings

Settings

The default shell is shown as follows:

Main Window

Main Window

Attaching to Other Applications / Windows

We can also attach a shell window to a running application. Here is the setting for this. Here we can select a process running on the machine which can be attached to.

Attach To

Attach To

Adding New Shells

As ConEmu is launched, it just displays the default shell selected in the settings page. This is completely configurable from settings page. We can also add a new shell which would show up like a new tab. This makes it a lot easier to switch between these shells.

Add new shells

Add new shells

Switching between Windows

It is a lot easier to switch between different shells as these shells are available as tabs. These shells can be of same or different types.

switching between windows

switching between windows

You can also switch from the Windows task bar as all the tabs appear as separate windows and you can switch between them as you desire as follows:

windows task bar

windows task bar

Searching on a Window

Although it is possible to find text on a console window, it is difficult. ConEmu makes it a lot easier to search for a text on a window. It has a search bar on top which can be used to enter the search pattern.

searching

searching

The search bar appearance can be controlled by appearance settings and we can get rid of this from Appearance tab in the Settings window.

search bar settings

search bar settings

NW.JS (node-webkit) – An Introduction

NW.JS (node-webkit) – An Introduction
Node webkit allows HTML5 applications to run in a desktop. It uses NodeJS and Chromium. Both are using the same V8 javscript engine. Since this runs as a desktop application, it doesn’t have the sandbox restrictions. So in the same page, you can open a file from file-system and then render the contents in the web browser.

NW.JS allows calling node js modules directly from DOM.

In this example, we would create a sample application which would read a JSON file from the file system and display its contents.

History of NW.JS

NW.JS was previously known as node-webkit. This was originally developed at Intel. This was open sourced at GitHub in 2011. NW.JS is GPU accelerated.

How is this possible?

How these two technologies work together when Chromium and Node JS has different message loops. Chromium’s message loop is based on MessagePump* family, while Node JS uses libUV for message loops. NW.JS implements MessagePumpForUV to bring Node JS’s libUV to Chromium message loop.

Downloading NW.JS

You would be required to download NW.JS package directly from github. I have downloaded here for Windows. The package needs to be unzipped. The contents are as follows:

nw.js package contents

nw.js package contents

First, Let’s say Hello to the World

Let’s first start with the Hello World example, to understand first how to run it simply. At the bare minimum, we need index.html and package.json files. Here are the contents of index.html; it just has a Hello World! text in the title and body.

Now comes the interesting bit; here are the contents of package.json. Generally, with package.json, we expect the details of npm packages for the app. But here we see some other details about the app itself. Since the app wouldn’t be running on a web browser directly; it has to run in nw.js window. Here we are providing some of the details about the window.

The window is not resizable; has no toolbars; and appears corresponding to the current mouse location. We have also provided the maximum and minimum dimensions for the window. The interesting part is what contents to display in the window?? That detail is provided by setting main; here we are using the contents of index.html.

In order to run this, we need to zip the folder containing the two files and change the extension from X.zip to X.nw. Now we can just drop the nw file to the nw.exe

open with nw.exe

open with nw.exe

And the app is shown as below:

nw app run

nw app run

Working With Files

Now let’s see if we can read the contents of a file using node module and display it in DOM. Let’s first add a javascript file main.js to the same folder containing index.html. Let’s update the contents of the file as follows:

Here we are reading the contents of GroceryItems.json using asyc readFile() provided from fs. After reading the contents of the file, it just logs it to the console.

After referencing the javascript file, we are just calling readGroceryItems() method in a script tag. It logs the json contents as follows:

Dev Tools nw.js

Dev Tools nw.js

Did you notice the dev tools? Yes DevTools are available for nw.js. We can enable that by setting the toolbars property of window to true as follows:

Creating and Deploying Local Scala SBT Packages

Creating and Deploying Local Scala SBT Packages
In the last few months we have discussed various features of scala. Some features required using other scala packages. In this post, let’s discuss how we can create our own artifacts. We can also discuss how we can use these packages in other scala projects locally.

Let’s create a sample Scala SBT project AdderLib. It is using Scala version 2.11.7 and SBT version 0.13.8. Just select auto-import to make sure that the packages are updated as soon as we modify the sbt file.

Create Project

Create Project

Let’s add an Adder type to the project. It just has one method which takes two operands of Double type as input. It returns the sum of the operands as Double.

Building Artifact

In order to generate an artifact, we need to provide some details. IntelliJ Idea supports the configuration. Here we are creating JAR package with the default settings.

Create Artifact

Create Artifact

As we add the artifact details, the Output tab for the project updates as follows:

Artifact Details

Artifact Details

Now we can easily generate the artifact. Just building the project wouldn’t generate an artifact. Just use Build Artifact from IntelliJ Idea menus. The artifact is generated in the directory we specified while configuring the artifact the details. By default, it is generated as follows:

Build Artifacts

Build Artifacts

Publishing Locally

We can use sbt to publish an artifact locally. This would publish the artifact to the local ivy repository .

Publish Locally

Publish Locally

The published artifact can be found on users .ivy\local folder.

Published Artifact

Published Artifact

We can publish to local maven repository as well. SBT provides publish-m2 command to publish to maven repository.

Publish Maven Repository

Publish Maven Repository

We can use this published artifact in another scala project on the same machine. Let’s create a new project AdderUser. Here we are using ivy repository. We update the build.sbt file for the project as follows:

Adder External Lib

Adder External Lib

Now we can use all the types exported by the package. Here we are using Adder type exported by the artifact. It adds two numbers using Adder.add and prints the result.

Using TypeSafe’s Config In Scala

Using TypeSafe’s Config In Scala
Our application behavior is generally defined with a set of configurations. Instead of hard-coding the values in the code, we like to define them separately in a configuration store. In this post, we are going to see how we can define configurations using TypeSafe’s config.

Let’s create a SBT project. We need to specify the SBT and Scala version we intend to use. You can leave it as default if you are not sure.

Create SBT Project

Create SBT Project

In order to use TypeSafe’s config, we need to add it as SBT dependency. Let’s modify build.sbt as follows:

Typesafe config allows us to define configuration files in a number of formats. Here we are using JSON. Yes, it supports the hierarchical configurations. These configurations can be accessed using DOT notation. For using the default behavior, we are saving the file in resources folder. We are naming the file as application.json.

ConfigFactory is used to load all application configuration. Since we are using the default behavior, we can use the default load method. It returns a Config object. Just look at how it provides methods to provide configuration value for various primitive types including Boolean, Int and String. So we don’t need to load it as a string and parse it to our specific data type.

As you can notice, it loads and merges all configurations in our application.

Merged Configs

Merged Configs

HTTP based Rest Service in Angular JS using Yeoman

HTTP based Rest Service in Angular JS using Yeoman

Service Oriented applications are implemented as a set of services working together to achieve a single objective. In this post we are going to learn how we can use REST based HTTP services from an angular-js client. Here we are using GitHub http service to get the details about a user.

This service would be defined for an application which is created using Yeoman. Let’s first add service github-user-service from command prompt using yo‘s angular:service generator.

Generate Service

Generate Service

This would result in creating a skeleton service in app’s service folder. Additionally, yo would add a file for writing unit tests for this service. Yes I am using Visual Studio Code.

GitHub Service Boilerplate

GitHub Service Boilerplate

Yo would remove all hyphens in the service name provided to the generator and replace them with upper-casing the following letter. So our github-user-service has become githubUserService. Now we are injecting $http and $q default services to this service. $http helps us in using HTTP based REST resources.

Since this is an external call which might have an inherent delay, we shouldn’t be blocking the caller. So we have also injected $q, which allows us to introduce promises to our design. As soon as we make HTTP call, we return the promise to the caller. As we receive a response, we are keeping our promise, and using the defer object created using $q to return the resolved data. In case of an error, $http provides error callback, which can be used to break our promise using defer’s reject method.

A service can be injected in a controller. Here we are injecting githubUserService to a controller. Since getUserDetailsPromise returns a promise, we can add callbacks for the cases where it is keeping and rejecting the promise. The first function is for the case where it keeps the promise. Here we are just writing the returned user details to the console. But before that we are just converting the javascript’s json object to a sting using JSON.stringify.

Let’s run the above app, it successfully calls github’s user service and prints the result on the console.

Stringified json to console

Serializing Custom Types for MongoDB using Salat

Serializing Custom Types for MongoDB using Salat

MongoDB stores documents in a Json like format, called BSON. Before inserting a document to MongoDB, it has to be converted into Bson. In this post, we are going to discuss how we can use Salat to convert a document into MongoDB’s compatible Bson. We will also see how we can deserialize a MongoDB document to your custom type. Here we will be focusing on Salat for such conversion.

Let’s first create a simple Scala SBT project. Here we are adding dependency for Casbah to interact with MongoDB. In order to serialize / de-serialize objects before sending them over to MongoDB. We need to add the SonaType resolver for Salat. Since we will be using DateTime, I have also included dependencies for Joda’s library.

Let’s create a type Student. It has only three fields: id (Int), name (String), admissionDate ( Joda’s DateTime).

MongoDB Installation

We first need to install MongoDB. Here we are downloading it from the official Mongo’s download page. It’s version 3.0.4. This is a packaged installer which installs it in program file directory.

Download MongoDB

Download MongoDB

After installation is completed, just go to the installation directory and run mongod.exe. This runs the database system on port 27017 by default.

You would also need a tool to view data stored in Mongo database. Here we are using MongoVue. It’s an amazing tool. There are also other useful tools for the same use case, RoboMongo is another very useful tool.

Mongo Vue

Mongo Vue

Using Casbah with Salat

Casbah is an official driver from MongoDB to interact from Scala. Here we are using Casbahs’s API to connect to mongo DB. We can specify the database and collection of interest. If either database or collection doesn’t exist, it would be created for us from MongoDB.

Casbah requires MongoDB document to insert into its collections. So the objects of our custom types must be converted into this before being inserted into mongoDB’s collections. Salat provides grater[T] for such conversion. As you can see, this is a generic type. Here T is a custom type being converted here.

As we run the code, we get the following exception. Since Joda’s DateTime is also a custom type, there is no apparent default support for this.

Joda's conversion failure

Joda’s conversion failure

Adding Support for Joda DateTime Serialization

In order to add support for Joda’s DateTime, there is already some serializer available from Casbah. It just provides some additional serializer for this purpose. Just see the updated import statements and method calls to register the serializers.

Now let’s run the code, we can see that the code successfully runs. It converts Student object to corresponding bson document, which is then inserted to Mongo DB. Just look at how successfully it has kept all the data types including Mongo’s type to hold data for dates.

Inserted Document

Inserted document

Deserializing Queried data from MongoDB

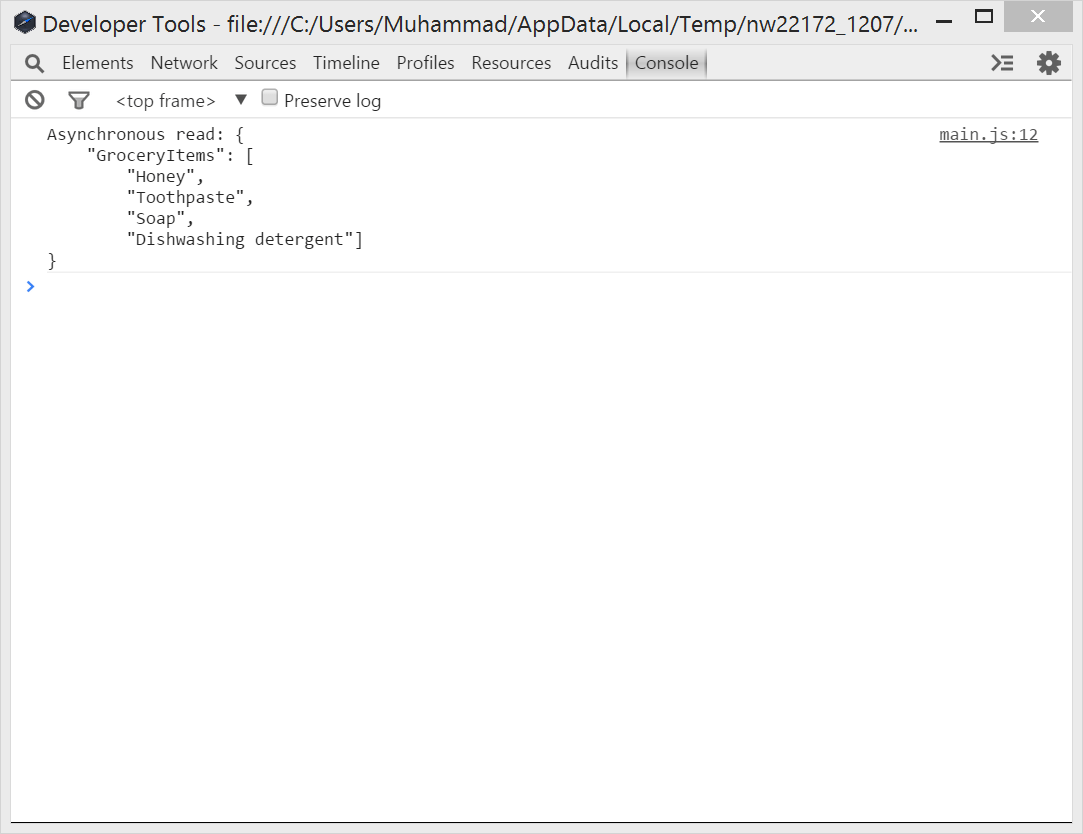
We can also read this data from the database and deserialize it back using the grater’s asObject method.

Just debug the code, here $lte from casbah is added. Since we are running the code at a later time with DateTime.now(), this should include data previously inserted. Just to make sure that we have the correct data, we are viewing in Evaluate Expression window.

Deserializing queried data

Deserializing queried data

Limitations about Embedded Case Classes

Let’s get a little more excited and start keeping data about student’s addresses. We might need to send them notifications about their dues from time to time. Here we have added StudentAddress type, plus we have added a field of the same type to Student.

Again, grater[T] is used for serialization. Here we have to use asObject method.

As we open the result in Evaluate Expression window after deserialization, Salat seems to be successfully able to deserialize it back to the same object. It has converted back even the StudentAddress based field, which seems pretty impressive.

nested case class serialization

nested case class serialization

Now let us update our code, to insert this to MongoDB. Here we are inserting the same object to mongo database. We are retrieving the result from mango using the same query code. Later we are trying to deserialize the result back to Student type using grater.

Just set a break point before after inserting the document to database. The weird thing is that, instead of sub-document, it has inserted StudentAddress based field as an array. It also has lost names of keys. This is bad. How the hell, Salat would be converting it back to the same Student object.

Embedded case class insert

Embedded case class insert

And it doesn’t. As we try to convert it back, it throws a big exception on our face.

exception while deserialization

exception while deserialization

This is painful as Salat’s documentation clearly states that embedded case classes are supported.

embedded case class support

embedded case class support

But we were able to convert it back to Student before. Apparently, Salat just didn’t understand address as an embedded document. It just keeps the info this info. While converting back, it just passes back from the same data. When it inserts data to mongo db, it just passes this confusion to casbah and let it handle the way it wants. When casbah reads it back, it just passes the way it save back to Salat. Now there is no way Salat has info about converting this array to StudentAddress, hence the exception. This theory is based on the following from Salat’s documentation on github.

embedded_class_to_casbah

Fixing Embedded Case Class Issue

Actually the issue is not the end of the world. Actually Salat does support this. It is easier to fix this. We just need to specify the package for case classes.

Now it correctly inserts the embedded case class correctly. It inserts it as embedded document. This is picked up by casbah, when queried. Salat now correctly deserializes the object to Student type.

Salat Embedded document

Salat Embedded document

I actually found the solution here:
https://groups.google.com/forum/#!topic/scala-salat/bNJeN0vA6Pc

Using Salat in Play Framework
In play framework a little bit of setup required in the code:

Just add the following code in the context:


RegisterConversionHelpers()

implicit val ctx = new Context {
    val name = "Custom_Classloader"
}

I have these import statements in my code:


import com.mongodb.casbah.Imports._
import com.mongodb.casbah.commons.conversions.scala.RegisterConversionHelpers
import org.joda.time.DateTime
import com.novus.salat._
import com.novus.salat.global._

In the absence of the above setup, you would get this error:


[GraterGlitch:

GRATER GLITCH – unable to find or instantiate a grater using supplied path name

REASON: Very strange! Path='Student' from pickled ScalaSig causes ClassNotFoundException

Context: 'global'
Path from pickled Scala sig: 'Student'


]

Compound Types in Scala

Compound Types in Scala
In the previous post we looked at Mixin composition with traits in Scala. This post is about a similar concept, called Compound types. The syntax is exactly the same, it uses the familiar with keyword. But there is some differences. Mixins are used to define types or instantiating them. On the other hand, compound types are used to specify dependencies as a sub-type of more than one types.

Example Scenario

Let’s consider a scenario where a person is asked to cover some distances. He can cover the given distance while walking or running. Apparently the person loves walking more than running. In order to keep things interesting for him, he can only walk in the patches of 5000 ft. He cannot walk more than three patches for covering the distance and has to run the remaining distance.

Distance more then maximum 3 walkable patches

Distance more then maximum 3 walkable patches

There can be no partial patches unless the given distance doesn’t cover a single patch. After the patch, the remaining distance must be covered while running.

Partial Patch

Partial Patch

Putting into Code

Scala provides with keyword to specify dependencies in terms of compound types. Here we are first determining, how many patches the person can walk before starting to run. In order to determine that we are first creating a sequence of numbers between 1 and 3. collect is selected because we need to filter and map.

Here we are filtering all those patches which can be covered while walking. If a distance lies in between two patch boundaries, it would be filtered by collect. We are then mapping the distance to cover the given patch.

Then we are getting the maximum patch. Any partial distance can be covered by walking.

Mixin Class Compositions in Scala

Mixin Class Compositions in Scala

Scala allows a class to inherit from other classes. With this inheritence, it can also mix-in behaviors from other classes. This allows additional behavior to be added to the classes. Traits can be added to provide generalization of orthogonal behaviors then mixed-in to the class definitions.

Here we have introduced two traits, Walker and Runner. A person can be both a walker and runner, so we are mixing in these two traits to our Person class definition.

Here we are instantiating the Person class defined above. You can notice that we are using run and walk methods which have been mixed-in from Runner and Walker traits respectively.

Mixin compositions can also be used to define singleton objects. Here we have Person object using the mixin compositions using Walker and Runner. You can also notice the syntax to mixin multiple traits with their individual with keyword.

We can mixin traits while instantiating classes with added members from mixin traits. A human object would have everything Human class defines. Additionally, it can use members from Walker and Runner traits.

It can also be a case class. Here we have turned Human into a case class with name field. We can see that we are mixing in members from Walker and Runner while instantiating a Human.

Scala just allows traits mixins and we cannot mixin classes. An attempt to do so would result in a compile time error as follows:

mixin_class

Traits Mixins with conflicting members
It is possible that traits have conflicting members. In the following example there are two traits Fixer and Doer with the same member doWork. Now which of these doWork would be picked up when we invoke it from the instance.

Actually Scala doesn’t like this conflict while mixing-ins. It simply results in a compile time error.

confliciting_traits

As the message suggests we need to override the conflicting members to get rid of the error. Let’s override this and provide a definition of the doWork method.

This makes compiler happy. But there is an interesting thing in the above code. We have called super.doWork(). So would it use it from Doer or Fixer. Actually scala has a straitforward policy to this, it would use the conflicting members from right to left while mixing in. Since we have Doer on the extreme right, it would use doWork from Doer.

Super when mixin

Super when mixin

Required Mixin for Instantiation
Scala also provides the support for mandatory trait mixing for a class instantiation. This is specially useful when we have more abstract definitions of trait and a more concrete trait is expected for the instances of the class.

In the above example, we have introduced a class Worker. It requires Fixer to be instantiated. We have also introduced a new trait AwesomeFixer which extends Fixer.

Required Mixin Compiler Error

Required Mixin Compiler Error

As we add the mixin for when instantiated, the compiler error goes away.

compiler_error_fixed

Refinements with Mixins

While doing the mixins, we can do further refinements. In the following example, we have introduced a case class XYZ with a field fullName. There is a method perform, which has a parameter performer specified in terms of a structural type with members name (field) and doWork (method). We have created instantiated obj from XYZ mixed in with Worker. Still it doesn’t fulfill the method parameter structural requirement. We can refine this with refinement by creating a new field name and assign it the fullName property from XYZ.

Scala’s Singleton Objects are powerful

Scala’s Singleton Objects are powerful
Scala provides the support for singletons by introducing object, which provides the anonymous type definition and its instantiation. The same instance is used throughout the life of application. This is different from the Gang of four’s singleton implementation that we are so used to. I have found there are various useful features which spawn from this great ability to create object.

Defining Singleton Hierarchies

As we have just discussed, Object are introduced to define singletons but we can also use them to introduce singleton hierarchies. In these hierarchies an Object would contain other Object (s) in a hierarchical fashion. We don’t need to define a corresponding type with container hierarchies.

Here we are just defining Key/ value pairs but scala’s singleton object allows us to further classify the key / value pairs. This is easier to maintain.

Singleton Hierarchies

Singleton Hierarchies

We also would be saved from the huge pain of long intellisense scroller as we hit dot on the key / value container. Here we are just trying to use MemberType, just notice how clean the intellisence looks. Isn’t it amazing?

intellisense

Scala has an amazing support of importing the members of Singleton. Just import everything from it and we can use all fields and member functions defined in the singleton without any name qualifier. They just appear as local functions, which they certainly are not. Here we have imported the members of MemberType. You can notice that we are using fullTime as it is defined locally.

importing_WithObjects

There is another way to do this. You don’t have to directly use an object. We can also use Selfless trait pattern. The pattern allows a companion object of a trait which has the same name as the trait.

Since Scala allows to import the members of an object, we can simply import the object. While writing the unit test, this can be specially useful.

Defining Utility methods

As we discussed above, when we import an object, all of its members are statically imported and we can use them directly. We can use this feature to define helper utility methods in objects and then import the object. Alternatively with Selfless trait pattern, we can define a trait and a companions object (i.e. same name). In any case, we need to import the object to have access to its members.

Now we can import the object members and use them as if they are local members. Here we are importing the members of HelperMethods object. Look how easily we are using greetings method without any preceding type / object name.

Debugging the code clearly shows that the method returns the message to greet a customer.

Utility Methods from Singleton Object

Utility Methods from Singleton Object

Tuple with named members

Tuples are specially useful when when we have to return more than one values from a method. But the fields in tuple are not named. Scala also supports tuple but the individual fields are still not named but underscored field indices values. So we end up with _1, _2,… in our code, which is not very readable. This also results in maintenance nightmare of our code base.

Object helps us here to solve this problem too. We can directly return an Object with named fields.

Although we don’t need to define the return type of the function; thanks to implicit type inference in scala. But since scala supports structural typing, we can do it if need be. An example case is to define a trait with structural type as return type of an overridable method.